Aside from the pillow case dress, this might be the easiest baby dress tutorial you will come across! The neck hole is already there and the skirt is pre-hemmed, giving even the novice sewer (that's me!) the ability to look pro. You'll need an adult size t-shirt, measuring tape, scissors, thread, pins, and of course your sewing machine. Oh, and chalk would be helpful.
The measurements listed here will make about a size 6 month dress.
But because it is made from a t-shirt, if you use elastic thread for your gather,
it will stretch to fit several sizes, and eventually become a toddler sized shirt.
If you do not use elastic thread for gathering, these measurements will fit the 6 month baby.
With minor measurement tweaking, you can tailor this pattern to fit a newborn or a larger child.
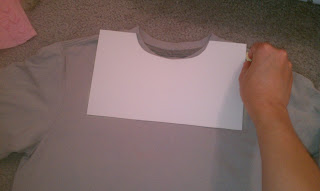
I cut out a square of paper that was 9.5" wide and 6.5" tall as my dress top template.
Center your square of paper (I cut a neck hole in mine - not necessary) at the top of the shirt,
and use chalk to trace around it. Then cut!
Next, cut a 14" wide by 9.5" tall square out of the bottom of the t-shirt. This will be your skirt.
Now you have your two pieces.
I ironed about 1/16" of the raw edges down on the dress top and then sewed them.
Now that the raw edges have been sewn inward, the dress top is about 9 inches wide.
Your next step will be gathering the skirt fabric. The skirt is cut to 14 inches wide, but you'll be gathering it so that it is the same width as the dress top (approx. 9").
Need to know how to gather the fabric? It's super easy. Click here.
Now that you have gathered your 2 pieces of skirt fabric to be the same width as the dress top,
it's time to sew the skirt pieces to the dress top.
As pictured below, lay the dress open, inside-out.
Pin the right sides of the top and skirt fabric together, then sew.
You're almost done!
Now it's time to pin and sew the sides of the dress together (inside-out, of course).
I started from the bottom of the skirt, and sewed all the way up until about 4 inches down from the shoulder, then stopped. Otherwise, this dress would not have arm holes :P
Hahaha I've made that mistake before!
Once you sew the sides up, you are done! Although, I did get kind of crazy and embellished my dress with a few buttons! I might get EVEN MORE crazy next time and use two different colored t-shirts for my top and skirt! The possibilities are endless!
I love this dress because it is comfortable enough to sleep in.
So my little girl can go from church to her crib without having to change into PJ's for her nap.
I love this dress because it is comfortable enough to sleep in.
So my little girl can go from church to her crib without having to change into PJ's for her nap.
Thanks for stopping by!
Perhaps if I become more regular at blogging my sewing tutorials,
I'll re-name my blog "Cynthia Tutes" or "Tutes by Cynthia"
Wait, no.


Cynthia, you're so cool and popular. I want to be like you.
ReplyDeleteYou're also funny.
ReplyDeleteWow, 3 comments already! They are really stacking up!
ReplyDeleteHa ha , you are so funny! But seriously good job! you are such a DIY girl!!!
ReplyDeletealso, you said an "Adult size" , will any adult size work? Medium, Large, XXL 2XXL? seems a bit big for a baby... :)
ReplyDelete^Yes David, any adult size shirt will work because you will be cutting it to size. The only think that would be effected is the size of the neck hole. If you were to use a tripple XL shirt, the neck hole may be a little big, but probably not too much. In my experience they are somewhat universal.
ReplyDelete